Fluffy Flower Brooch Tutorial Using Rowan Kid silk haze

This is a little crochet pattern for these fluffy flower brooches. They are great as brooches or to add as embellishments. I have written this in longhand with abbreviations highlighted to make it easier for beginners to follow. Image

Materials Double knitting yarn for the center (selfstriping works best)

Rowan Kid silk Haze for the outer petals.

Crochet hook 4

Crochet hook 5 (If you are a loose crocheter I would go down a size in hooks)

wool needle

sewing needle

coloured cotton

assortment of buttons.

Scissors

Image

Using the Dk CHain 4, join with a Slip Stitch to the first CHain forming a circle. Image

3 CHain then Treble Crochet into the circle (yrh put hook through circle yrh pull back through. (3 stitches on hook) yrh pull through 2 stitches yrh pull through remaining 2 stitches) repeat 13 more times, you can move the stitches along slightly if it gets tight.

Join with a Slip Stitch to top of 2chain (1st stitch) Image

CHain 6 (3chain counts as Treble Crochet), miss a SPace TReble Crochet into next SPace

*CHain 3 miss a SPace Treble Crochet into next Space* repeat all the way around,

join yarn into the base of first stitch with a Slip Stitch. Image

Next is making the petals. DC,TRC,DTRC,TRC,DC into each space /(3chain) joining  with a SS at the base of each.

Longer version for beginners.

Into first 3 CHain, *Double Crochet, Treble Crochet, Double Treble Crochet, Treble Crochet, Double Crochet, Join to the base of the next 3 CHain with a Slip Stitch* repeat until you have completed all the petals. Join with a Slip Stitch.

Cut off yarn and pull it through the last stitch. Turn your flower over. Image

Put your hook through the back of the stitch wrap orange yarn over hook, and pull back through making sure there is a long end.

*CHain 8, Miss a space/stitch Slip Stitch into back of next Space* repeat all around. Join into first Stitch with a Slip Stitch.

Cut Yarn and pull through stitch.

chain8orangearound

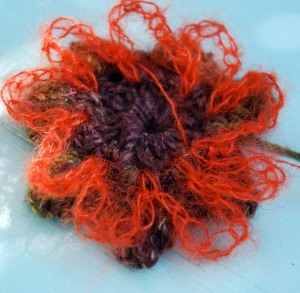
Next insert the hook in the back of the stitch between the orange petals. YRH pull through Stitch.

pickupgreengreen Kid silk Haze Rowan

CHain 12 miss a stitch, Slip Stitch into back of the next Stitch (between the orange) CHain 12 repeat all the way around, Slip Stitch into last Stitch/Space cut yarn and pull it up through last stitch.

Sew in the ends using a wool needle. I would  turn the flower over so the front is facing and pull up the wool ends so that they are on the front of the flower, then sew them in (not visible from the back leaving it neat). Then choose a large button use a sewing needle and cotton and stitch it into the center. I would secure the cotton first again on the front side of the flower (under the button) then sew the button on, sewing the cotton through to the back with the last stitch, turn the flower over and stitch on a brooch back. Secure cotton and cut off as close to the brooch back as possible. You should end up with a very neat finish.

I hope this is helpful for crochet beginners. If I have written anything wrong or you have problems with the pattern do let me know 🙂 I would also love to see any flower brooches made using this pattern. Have fun.

Funky Scrumbled Crochet Brooch Tutorial.

Image

I have been making these little brooches for a few years and have been asked so many times how I make them that I thought I would show you how.

They start as a basic circle, then using surface crochet and lots of different yarns they build up into colourful  textured mini works of art.  Ready to embellish with beads and buttons.

I love things that whip up quickly and these are perfect for in between other projects when you just want to start something and finish it in one go. It is also great for using up little scraps of yarn. Strips of fabric can also be crocheted in.

Materials 

Dk yarn for basic circle ( I used 100% organic cotton by Rowan)

Assorted yarns for scrumbling .  

(I was lucky enough to run my own yarn shop and used to buy all the unusual glittery and textured yarns like Energia by Adriafil, Monello by AdriafilGedifra Riana Colour,and my favorite Amara by Gedifra, all great for using in these brooches. )

Assorted crochet hooks 4 mm to 6.5mm 

Wool sewing needle,

Beading needle,

Cotton for sewing in beads and sewing on the brooch back,

Brooch back.

First make your circle.

Making  a Basic circle.

1st  round : ch 4,join with a ss into first ch.

2nd round:  ch 2 (acts as first dc)  7 more dc into ring. ss to first st.

3rd Round : ch2,  2 dc into each into next 7 sp, (stitches) 1dc join with ss

4th round : ch 2, *1 dc into next sp, 2 dc* into next sp repeat from * to * to end join to top of first st with ss

5th round :ch 2, 2 dc into first sp * 1 dc into next 3 sp 2 dc into next sp * repeat to end

you can make the circle bigger by following this method ie next round 2ch, 2dc into first sp, 1 dc into next 4 sp etc.

Image

Image

Take the first yarn you are going to use and the appropriate size hook, I am using a size 4mm with Dk yarn. Go through the ccircle and wrap the yarn around the hook, bring the hook back up through the circle.

Image

ImageImage

Put the hook back through another space/stitch wrap yarn around and bring back through circle (making a stitch) . Pull stitch through stitch already on hook leaving 1 stitch on the hook.

Image

Image

Repeat all over the circle making a chain stitch on the surface of the circle.

When it looks like the picture below cut off the yarn and pull through the stitch securing the end.

Image

Image

Pick your next yarn, I have a contrasting colour and repeat as above. With this thick wool I could have gone up a hook size but I am such a loose crocheter that it was fine with the hook I was using for the previous yarn. There are no rules to this it is all about being creative and experimenting. you can crochet over the top of the previous yarn in a random pattern.

Image

Image

When you have finished cut off your yarn and pull it through the last stitch to secure it.

Pick up your next colour and repeat as above.

Image

Image

The last yarn I used to go over the circle has a bit of sparkle to it. ( I can’t remember the name of it but will edit this when it comes back to me) This shows the back of the brooch.

Next is the edging, using a wool with a bit of sparkle or texture, single crochet around the edge. (hook through space, yarn over, pull back through (2 stitches on hook) yarn over pull through 2 stitches) Repeat this around the edge.

Image

Image

Image

This gives it a nice finish and brings it back into shape.  While doing the scrumbling your circle can lose its shape slightly, this is normal and due to the different textures of yarn. I sometimes remedy this by crocheting it back into shape if it is to distorted.

Next sew in all the ends neatly at the back of your brooch then embellish with beads and buttons of your choice by stitching them on with needle and thread.

Add a brooch back to the reverse, wear with pride 🙂

If you have any queries or I have made any mistakes do let me know by leaving a comment.

I have found some of the Gedifra yarns on sale here at Knits in The City Sari silk and ribbon yarns are also good for this kind of surface pattern.

How to Make a Easter Crocheted Basket

This is a tutorial on how to upcylce a little basket we get in the uk at Lidls usually full of garlic.

Image

I have been saving these little baskets with the idea of using them for putting handmade presents in (they do not smell as the garlic is in its skin). I have finally got around to experimenting with them.

You could use this idea for any type of similar basket.  I am not very good at throwing things away that I think can be reused.

Image

This basket was crocheted with double knitting yarn, I will post another picture of one I did with chunky wool at the end.

You will need about 25g  of dk wool or cotton (pastel shades look great)

A crochet hook to match yarn 4-4.5mm

(I used 3.50 because I am a loose crocheter, you may want the stitches to be neater and tighter it all depends on your own tension)

Ribbon

Put crochet hook under top layer of raffia on the basket.

Image

Yo (yarn over) and pull back through, make sure there is a long end that doesn’t pull all the way through.

Image

Image

Yo pull back through stitch (ss) slip stitch.

Use the top layer as raffia as you would your foundation chain in crochet.

Put hook under raffia Yo pull back through (2 stitches on hook) Yo pull though 2 stitches (DC)

Image

This first row is quite fiddley as you have to hold the stitch the basket and the hook. I did it going around with the hook on the right but you may prefer going the other way around, there is no right or wrong way it is whatever feels comfortable.

Image

Once you have gone all the way around join to first stitch with a slip stitch.

Next row

Chain 2,* Dc into next sp and each folllowing space until you get to the 1st corner, 2Dc into corner sp* repeat all the way around join to first st (2ch) with a slip st

Next row as above.

Image

Next row 2 chain 1 DC into each sp dec 4 stitches evenly around.

To decrease,  go as to do a DC, Yo put hook through sp Yo pull back through. (Instead of Yo and pull through 2 sts then yo pull through next 2 sts leave the three stitches on the hook) repeat into next sp while keeping those 3 sts on hook (6sts altogether) Yo  pull yarn through 3 sts, Yo pull yarn through next 3 sts. Thats a decrease in Double Crochet.

I know a lot of you may already know that but explaining it like that hopefully makes it a bit easier for beginners.

Pictures of decrease.

Image

Image

Image

Next row the same as above Join with a slip stitch at the end.

Next Row (I turned the basket upside down for the next couple of rows)

2ch, DC, Dec1 (as instructions above) DC Dec1 repeat around, join with ss.

Image

Image

Next row

2 chain, DC Decrease all the way around. Join with ss.

Next Join sides together put hook through other side Yo pull through both stitches (Ss) repeat neatly along  the line until it is all joined finish with a ss cut yarn and pull through remaining stitch.

Image

Image

Take your ribbon and thread it through the crochet (I did it roughly in between every third stitch)

Image

Tie a lovely bow at the front, hopefully better than mine, bows are not my forte. Have fun if you have any problems you can tweet me or facebook me.

Image

If you are good at sewing you could line the basket with gorgeous vintage fabric. These could be used for putting handmade soaps in or chocolates, they make a nice gift basket.

This is one made with chunky wool.

Image

How to Needlefelt a Bird Brooch Using Cookie Cutters

I teach needle felting and use it a lot in my own work. I have often been asked  for needlefelting tutorials. This will be the first of many.

Needle felting is a form of felting using a barbed needle (no this won’t work with just any needle) to matt the fibers together. It is important to use a foam block at least 7cm high, this is to protect the surface you are working on. The needle is very sharp and hurts a lot when you miss your work and hit your finger (do not chatter at same time as felting, and always keep your eye on the needle.) I am of course speaking from experience.

Equipment

Image

You will need.

1 or 2 felting needles

(they are quite brittle and can break especially when you are just beginning)

Assorted Cookie Cutters

Merino tops/roving in assorted colours

Foam base or brush base as found in craft shops.

Plasters…just incase.

Image

Fill your cookie cutter withe merino and push it in slightly. It will go down a lot when felted.

Image

With the cookie cutter filled with merino on top of the foam, begin to needlefelt. Hold your needle upright and push it in and out of the merino, (being careful not to hit the side of the cookie cutter) in a pricking action. Do not do it to slowly as this can cause the needle to snap. You need a nice constant stabbing motion with the needle always staying upright.

Needlefelt until the fibers start to matt together, it can take a little while. Make sure you hold the cookie cutter on the outside.

Image

Take your bird out of the cookie cutter and turn the cookie cutter over then turn the bird over and place back in the cookie cutter. This is to felt the back of it, if you feel there are some bits that are to thin you can top it up with more merino. Continue felting this side until it forms a solid piece of felt in the shape of a bird (or whatever shape you have used). You can keep taking it out and turning it over until you are satisfied.

It should look like this.

Image

I then added some colour to the bird and an eye using the merino. You can take it out of the cookie cutter to do this and just work on it as normal. If you have not needlefelted before, you could try felting some patterns on a plain piece of felt to get the feeling of ‘painting’ with the merino.

You only need to use small bits at a time to add to the surface of your bird. It is amazing how easy it is do to this bit.

Image

Once I was satisfied with the colours I added some simple embroidery stitches.

Image

I am not entirely pleased with this one and may need to experiment a bit with colours…but thats the fun of it. The thing about crafting is not be afraid of not doing your best first time especially if your are learning a new skill. Take what you’ve learned from each piece and move onto the next. I will be having fun this week experimenting with my assorted cookie cutters I was lucky enough to pick at a Flea market on Sunday.

I made this swallow from another one.

Image

I hope this tutorial is helpful do let me know if you enjoyed it 🙂

How to knit a Ring

I thought I better add the instructions to go with my previous blog.

Cast on 6 stitches using 4 ply and size 2.75 or size 3 needles

I am a loose knitter so used 2.75) You want quite a tight knit.

Knit until work measures 7 cm.  Cast off .

you can maker it bigger or smaller depending on the size of your finger, and it will stretch slightly.

Add some embroidery stitches. I used Embroidery floss but you could use left over bits of wool in different colours.

Running stitch and french knots are very easy to do.

To make a french knot you put the needle up  through the fabric and wrap the cotton around the needle twice, pull the needle up through the wraps and push them down to be neat against the knitting, then put the needle back in just under the stitch pull the cotton through gently. Repeat along the ring as often as you like. I made 4.

Sew on some beads or buttons for a bit of sparkle.

Put the edges together inside out and stitch up. 

Sew the ends in and turn the right way round, wear with pride 🙂

Why not make all your friends one .

You could use different stitches and unusual yarns. Self striping sock wool would be good for this tiny project and you could make hundreds with 1 ball of wool.

The pictures to go with these instructions are on my previous post.

Image

Knitted Ring Photo Tutorial

Knitted Ring Photo Tutorial

Here is a photo tutorial on how to make my little knitted rings. I will add more instructions tommorow.
I cast on 6 stitches using 4 ply using 2.75mm needles (I am a loose knitter). I actually prefer 4 stitches to make a thinner ring but felt this shows the details better. Knit approx 6-7cm it does stretch slightly. Would love to hear your comments and you could post a picture of any you make on my face book page http://www.facebook.com/pages/Tamsyn-G/151441028213232 if you like 🙂